final curated blog

This image is the fusion360 file of the result of the week 5 tutorial. It is disassembled in the picture, ready to be ported over to illustrator and laser cut. I believe it deserves to be in this curated blog as it shows my early fusion360 usage, and thus that I was learning rapidly from the online tutorials.

The first model I made was this one on the right. While not being of questionable quality, it is nonetheless important to include in this blog as a point to reference all the other physical models, and document the improvements. My design process can clearly be seen to have worked when this model is compared with the later ones. It is not to scale.

This is the third model I created, and the first one that took a fair amount of time. It is a creatively enhanced version of the room where I work, and is in 1:10 scale. It utilises some of the techniques from the studio in week 5, including concertina folding (not visible in this picture) and X-form spans to create the stylised arching roof. Therefore, as it shows the combination of several models and techniques, it illustrates a key step in my design process and deserves a spot in this curated blog.

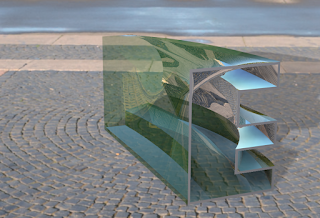
This image is of the completed fusion360 file of my initials. It is important to include here as a reference point for the next photos.


These two screenshots are the week 8 continuations of the initials. They are rendered with different materials and different backgrounds. The one on the right was the first render, and has a muted, calmer background with light blue clear glass material. The one on the left is the third render and is more fancy, having mirrored inner surfaces with a clear green glass outside and matt granite faces on either side. They document the development of my design process, being metaphorical reflections of the windows in my room due to their calming and realistic colouring schemes.

This is the physical model of the fusion360 model of my upstairs hallway. It is made 1:1 scale with the file, and is thus very small in comparison to the other models. It is important as it shows that I had by week 8 developed the physical modelmaking skills to create small designs that were still improvements of the initial, rough model (seen above).


These two images are two side by side shots of the final project model from the outside, clearly showing the person, window structure and banksia outside. The one on the left was not going to be included in this curated blog initially however serves as an excellent contrast to the one on the right. The left picture is taken using only flash from a phone camera. This gives the image a yellow tinge, making it seem sunny and thus not what I was aiming for. However, the image on the right was a result of inspiration: I turned off the lights and the moon illuminated my room during a late night of working. This gave me the idea to use a torch with light that looked very similar to lunar light, to demonstrate the importance of natural light to my room. The final picture (below) shows what the light entering the room illuminates and how it flows from the windows to the far side, where my desk is situated. This model is in 1:25 scale.

Comments
Post a Comment